DIY Beeswax Wrap - demo video and step-by-step guide
For those of you who attended our DIY Beeswax Wrap night, or for those who had an interest and wish they attended, we are sharing a demo video and a step-by-step guide so you can make these wraps for your family and friends. We hope that every home in PEI and beyond will move from plastic wrap/saran wrap and plastic baggies to these eco-friendly beeswax wraps (or vegan soy wraps).
Here is the demo video from June 20th DIY Beeswax Wrap Night, the demo was done by the amazing Happy Oceaner Lori Fagan:
DIY Beeswax Wrap Guide:
MATERIALS:
-wax:
Beeswax, broken into smaller chunks
Sourcing on PEI: Moonsnail Soapworks, Honey on the Hill, Health Within (located at Dynamic Fitness building), Michael's Crafts Store
Vegan alternative: Soy Wax, broken into smaller chunks
Sourcing Michael's Craft Store; Savings tip - watch for the Michael's Craft Store Saving Coupons
-heat source: toaster oven, oven, stove top, hot plate
-oven mitts
-wooden chopsticks, dowels or tongs
-100% cotton cut into squares.
Recommended sizes:
small: 4x4 inches
medium: 8x8 inches
large: 10x10 inches
extra large: 12x12 inches
-scraper: used gift card or debit card (made of hard plastic)
-foil tray(s) to melt wax in. Recommended sizes:
-craft paper or old shower curtain to protect your work surface
-parchment paper sheets cut into 12 x 14 rectangles
ESTIMATED COST:
As a cost estimate for our first session we did 60 squares (8 x 8 inches), with 2.2 lbs (1kg) of beeswax for $36. Prices change due to getting beeswax and fabric on sale, as well as the size of your fabric and the extra embellishments you may choose to use (buttons, stickers, yarn etc).
SAFETY NOTES:
Since you are working with hot wax please use caution. Keep hot wax out of reach of young children. Please use oven mitts to protect your hands. When you have completed your project, please turn off all heat sources and place wax in a safe area to cool. Have a First Aid Kit nearby to be safe.
INSTRUCTIONS:
1) Cover your work space with craft paper or shower curtain and secure with tape or clips.
2) Heat wax in foil tray on your heat source until melted.
Recommended oven temperature: 200 degrees Fahrenheit (2-3 minutes until wax is liquid)
3) Using chopsticks, dip cloth into melted wax. Ensure surface on both sides of the squares are completely covered.
4) Gently lift waxed cloth out of tray and allow excess to drip off into the foil tray.
5) Place waxed cloth onto sheets of parchment paper to cool. For beeswax wrap allow 1-2 minutes to cool. For soy wax wrap allow 5 mins to cool.
6) Begin scraping the wax wrap using the plastic card. Scrape both sides until excess wax is removed and the surface feels smooth.
7)Save the excess wax shavings and reheat and reuse.
8) Set aside the scraped wax wrap and repeat the process with a new cloth square.
Note: Keep the melted wax warm until you have completed all of your cotton squares.
STORAGE AND REFRESHING THE WRAPS:
-Fold wraps and store in a cool dry place. You can fold it into a neat square or roll them around an old paper towel cylinder.
-clean with cool/tepid water and a drop of enviro -friendly dish soap.
-to refresh a tired looking wax wrap, place the wax wrap between 2 sheets of parchment paper. Carefully use a heated iron to "press" the wraps. Iron the wrap for a few seconds on each side. To avoid wax run-off, iron the wraps on a protected surface.
-avoid microwaving your wax wraps. Some of our members have advised that they have placed wax wrap between parchment paper and been able to microwave for under 30 second to refresh them and remove any wrinkles the wraps may develop over time.
-we do not recommend the use of wax wrap on raw meat products.
CLEAN UP TIPS:
-save your wax scraps to reheat and reuse
-to clean off your chopsticks/dowels, simply wrap them in parchment paper and put into microwave for 25 seconds, remove them and wipe off the wax. You may also use the plastic card to scrape off any wax by hand.
-beeswax wraps last for a year depending how often they are used, imagine the equivalent in plastic wrap and baggies!
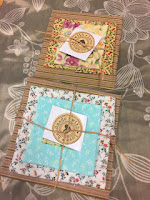
MAKE IT PRETTY:
-fold your completed wraps into the shape of your choice. eg. squares, rectangles, or roll them.
-adorn with natural raffia bow/string/yarn, paper stickers, wooden buttons, etc.
-give as a gift
MAKE IT FUN AND PAY IT FORWARD:
Making your own wax wrap is fun, economical, and good for the environment.
Have a wax wrap parties with your family and friends.
WAX WRAPS ARE VERSATILE:
-fold a larger square to create an envelope and forego using plastic baggies
-use it to cover a bowl
-wrap partially cut produce
-use a wax wrap to pretty up a mason jar
-use it to wrap snacks eg: coconut chips, raisins, nuts etc.
-use a wax wrap for gifts to reduce litter

We would love for you to share if you make these wraps using the demo video and guide, either via the comments or by email. Thank you for making a choice to eliminate single-use plastic from your life. For more inspiration check out our blog posts from the three DIY Beeswax wrap nights: May 14th, June 14th, June 20th and Day 10 of our 31 Day Plastic Free Challenge (May), "Invest in Beeswax Wraps".
Here is the demo video from June 20th DIY Beeswax Wrap Night, the demo was done by the amazing Happy Oceaner Lori Fagan:
DIY Beeswax Wrap Guide:
MATERIALS:
-wax:
Beeswax, broken into smaller chunks
Sourcing on PEI: Moonsnail Soapworks, Honey on the Hill, Health Within (located at Dynamic Fitness building), Michael's Crafts Store
Vegan alternative: Soy Wax, broken into smaller chunks
Sourcing Michael's Craft Store; Savings tip - watch for the Michael's Craft Store Saving Coupons
-heat source: toaster oven, oven, stove top, hot plate
-oven mitts
-wooden chopsticks, dowels or tongs
-100% cotton cut into squares.
Recommended sizes:
small: 4x4 inches
medium: 8x8 inches
large: 10x10 inches
extra large: 12x12 inches
-scraper: used gift card or debit card (made of hard plastic)
-foil tray(s) to melt wax in. Recommended sizes:
-craft paper or old shower curtain to protect your work surface
-parchment paper sheets cut into 12 x 14 rectangles
ESTIMATED COST:
As a cost estimate for our first session we did 60 squares (8 x 8 inches), with 2.2 lbs (1kg) of beeswax for $36. Prices change due to getting beeswax and fabric on sale, as well as the size of your fabric and the extra embellishments you may choose to use (buttons, stickers, yarn etc).
SAFETY NOTES:
Since you are working with hot wax please use caution. Keep hot wax out of reach of young children. Please use oven mitts to protect your hands. When you have completed your project, please turn off all heat sources and place wax in a safe area to cool. Have a First Aid Kit nearby to be safe.
INSTRUCTIONS:
1) Cover your work space with craft paper or shower curtain and secure with tape or clips.
2) Heat wax in foil tray on your heat source until melted.
Recommended oven temperature: 200 degrees Fahrenheit (2-3 minutes until wax is liquid)
3) Using chopsticks, dip cloth into melted wax. Ensure surface on both sides of the squares are completely covered.
4) Gently lift waxed cloth out of tray and allow excess to drip off into the foil tray.
5) Place waxed cloth onto sheets of parchment paper to cool. For beeswax wrap allow 1-2 minutes to cool. For soy wax wrap allow 5 mins to cool.
6) Begin scraping the wax wrap using the plastic card. Scrape both sides until excess wax is removed and the surface feels smooth.
7)Save the excess wax shavings and reheat and reuse.
8) Set aside the scraped wax wrap and repeat the process with a new cloth square.
Note: Keep the melted wax warm until you have completed all of your cotton squares.
STORAGE AND REFRESHING THE WRAPS:
-Fold wraps and store in a cool dry place. You can fold it into a neat square or roll them around an old paper towel cylinder.
-clean with cool/tepid water and a drop of enviro -friendly dish soap.
-to refresh a tired looking wax wrap, place the wax wrap between 2 sheets of parchment paper. Carefully use a heated iron to "press" the wraps. Iron the wrap for a few seconds on each side. To avoid wax run-off, iron the wraps on a protected surface.
-avoid microwaving your wax wraps. Some of our members have advised that they have placed wax wrap between parchment paper and been able to microwave for under 30 second to refresh them and remove any wrinkles the wraps may develop over time.
-we do not recommend the use of wax wrap on raw meat products.
CLEAN UP TIPS:
-save your wax scraps to reheat and reuse
-to clean off your chopsticks/dowels, simply wrap them in parchment paper and put into microwave for 25 seconds, remove them and wipe off the wax. You may also use the plastic card to scrape off any wax by hand.
-beeswax wraps last for a year depending how often they are used, imagine the equivalent in plastic wrap and baggies!
MAKE IT PRETTY:
-fold your completed wraps into the shape of your choice. eg. squares, rectangles, or roll them.
-adorn with natural raffia bow/string/yarn, paper stickers, wooden buttons, etc.
-give as a gift

MAKE IT FUN AND PAY IT FORWARD:
Making your own wax wrap is fun, economical, and good for the environment.
Have a wax wrap parties with your family and friends.
WAX WRAPS ARE VERSATILE:
-fold a larger square to create an envelope and forego using plastic baggies
-use it to cover a bowl
-wrap partially cut produce
-use a wax wrap to pretty up a mason jar
-use it to wrap snacks eg: coconut chips, raisins, nuts etc.
-use a wax wrap for gifts to reduce litter

We would love for you to share if you make these wraps using the demo video and guide, either via the comments or by email. Thank you for making a choice to eliminate single-use plastic from your life. For more inspiration check out our blog posts from the three DIY Beeswax wrap nights: May 14th, June 14th, June 20th and Day 10 of our 31 Day Plastic Free Challenge (May), "Invest in Beeswax Wraps".


Comments
Post a Comment